


Views: 0 Author: Site Editor Publish Time: 2026-08-19 Origin: Site


Wrestling with a clunky, rigid wire crate is an incredibly common frustration for many dog owners. You often end up exhausted. You might even walk away with pinched fingers. Folding your crate should be a simple, 30-second tactical process. It should never feel like a physical struggle. Folding mechanisms are a practical necessity for both travel and storage. They also serve as a key metric for evaluating overall build quality. Poorly designed hinges indicate a fundamentally weak frame.
This article provides a standardized, safe method for collapsing these crates. We want to help you protect your hands and preserve your hardware. You will learn the exact sequence required to pack up your setup safely. We also establish a clear framework for your future purchases. By the end, you will know how to evaluate whether your current hardware is genuinely portable.
Standard metal crates fold in a predictable sequence: top down, ends in, sides folded.
Always remove the floor pan and divider before attempting to collapse the frame to prevent hinge damage.
Persistent jamming or stiff latches are indicators of structural fatigue or rust, signaling a potential need for replacement.
When evaluating upgrades, a foldable aluminum dog crate offers a superior strength-to-weight ratio for travel, while a foldable stainless steel dog cage prioritizes long-term durability and rust resistance.
Injuries happen most frequently during the initial preparation phase. Pinched fingers and bent hinges usually result from forced, hasty movements. People often try to collapse the frame while it is still fully loaded. This is a guaranteed recipe for broken hardware. Preparation requires stripping the unit down to its base components. You must remove all obstacles before applying any pressure to the frame.
First, clear the interior entirely. Remove all blankets, orthopedic beds, and chew toys. Detach any clip-on water bowls from the wire mesh. Even a thin towel can obstruct the folding path. The side panels require zero clearance to fold perfectly flat against the base. Any obstruction creates uneven torque on the hinge loops. This torque bends the metal permanently over time.
Next, you must remove the floor pan. Unlatch the bottom retention clip located near the front door. Slide the plastic or metal floor pan completely out of the frame. Attempting to fold the crate with the pan inside guarantees hinge misalignment. The pan adds rigidity to the base. It prevents the bottom edges from shifting inward. Set the pan aside until the frame is fully collapsed.
If you utilize a puppy divider panel, detach it now. Unclip the divider from the side walls and remove it entirely. Dividers add internal cross-bracing. They make it physically impossible for the sides to collapse.
Finally, adopt a proper safety stance. Position the crate on a flat, stable surface. Hardwood floors or concrete driveways work best. Keep your hands flat on the outer framing wires. You must strictly avoid the direct hinge-points. Intersecting metal panels act exactly like scissors. Gripping the hinges directly during a collapse is incredibly dangerous.
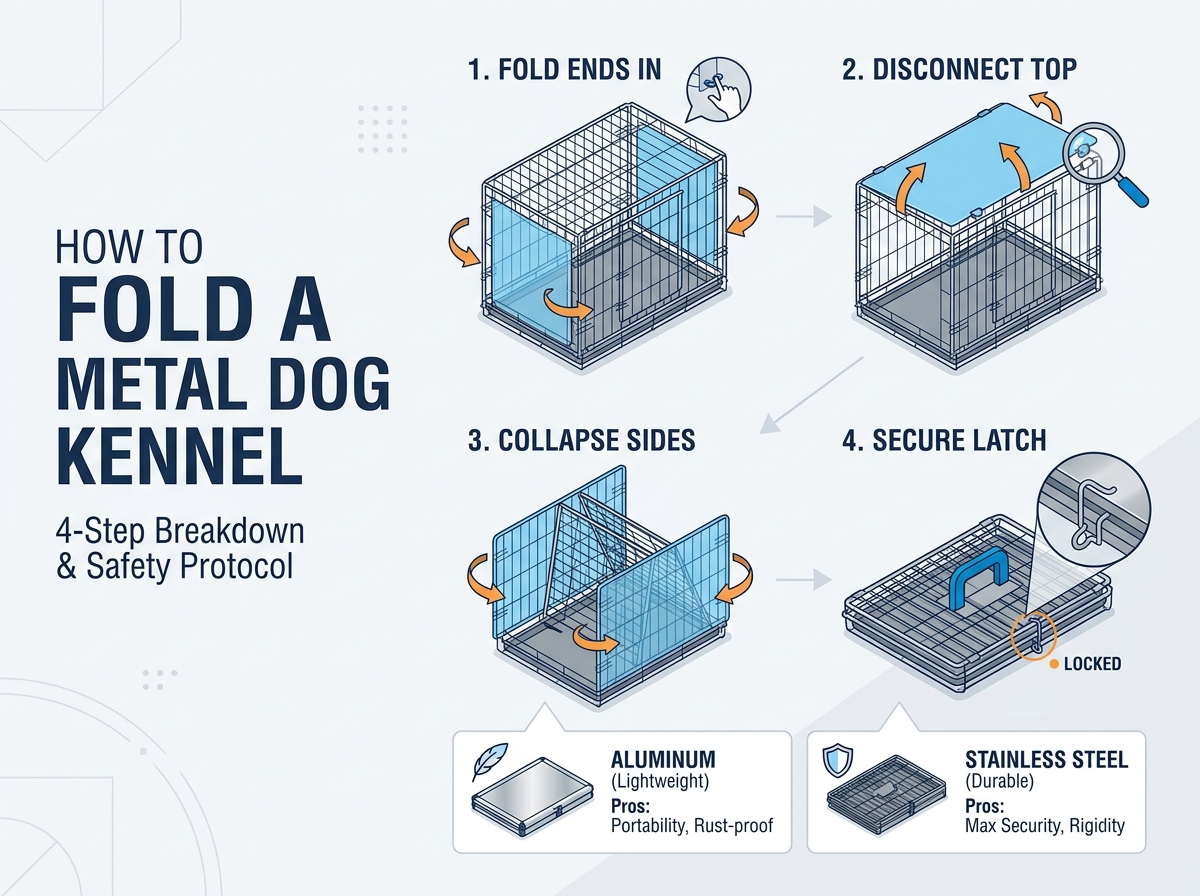
This standardized teardown process applies to nearly 90% of slide-bolt and drop-pin wire crates on the market. Manufacturers utilize a surprisingly uniform design language. Memorizing this specific sequence prevents mechanical binding. Attempting these steps out of order will lock the hinges in place. Follow this sequence exactly to ensure a smooth, 30-second teardown.
You must start with the short end panels. Locate the locking clips or slide-bolts securing the front door panel to the roof. You will find similar clips securing the rear panel. Disengage these latches carefully. Push the locking pins out of their respective housing loops. Once free, carefully let the front and back panels fold inward. They should drop down and rest completely flat against the bottom wire mesh.
Best Practice: Guide the panels down slowly. Letting them slam against the floor stresses the bottom hinges.
Common Mistake: Forgetting to unlatch the rear panel. This locks the top panel in place, preventing the next step.
With the front and back panels resting flat, address the roof. Unclip the side hooks securing the top panel to the side walls. Most crates use gravity-hook latches here. Lift the top panel slightly to unhook it. Allow the top panel to fold flat against the side of the crate. It is usually permanently hinged to one specific side wall. Let it hang freely alongside that wall.
Best Practice: Ensure the hanging top panel does not snag on your clothing. Stand slightly back as it swings down.
Common Mistake: Yanking the panel forcefully. If it resists, double-check that the end panels are fully disengaged.
You are now left with two upright side panels. Push these remaining upright panels inward toward the center. They should collapse over the already folded front and back panels. The motion resembles a clamshell closing. The side bearing the top panel will fold down first. The opposite side will fold over it, encasing the entire structure.
Best Practice: Apply gentle, even pressure to the top corners of the side panels. They should fold effortlessly.
Common Mistake: Pushing near the bottom hinges. This causes the wires to bind and resist the folding motion.
Your crate is now a flat, rectangular stack of wire mesh. Locate the small, swinging hook on the exterior edge. This is the transportation latch. Clip it over the folded panels. This hook locks the entire assembly tightly together. It prevents the heavy metal panels from springing open during transport. You can now slide the floor pan back into the collapsed frame or carry it separately.
Not all crates collapse cleanly after months of continuous use. Daily wear and tear degrades the hardware. This is especially true for heavy-duty breeds like German Shepherds. These strong dogs test crate integrity daily. They lean against the doors and paw at the sides. This constant pressure subtly warps the alignment tracks. When the alignment shifts, the folding mechanism fails.
Corrosion and rust represent the most common mechanical failures. Identify rust buildup on the small hinge loops. Moisture from spilled water bowls accelerates this corrosion. Rust creates friction, locking the joints in place.
Actionable Fix: Apply a high-quality, silicone-based lubricant to loosen stiff joints. Work the hinge back and forth gently.
Safety Warning: Absolutely avoid using toxic lubricants like WD-40 on interior surfaces. Dogs frequently lick the wire mesh. Ingesting industrial lubricants poses severe health risks.
Bent wire frames also cause severe jamming issues. Assess if a forced fold previously bent the structural alignment tracks. If you forced a side panel down while a toy was underneath, the wire likely bowed out of shape.
Risk Factor: Bent structural wires severely compromise the security of the kennel. When reassembled, these bent gaps allow escape artists to pry the panels apart. Weakened structural integrity leads to breakouts.
Actionable Fix: Use heavy-duty pliers to bend the specific wire back into straight alignment. Do not attempt to bend the main support frame.
Latch misalignment is another frequent frustration. Sometimes, the side clips simply will not disengage from the roof panel. This usually means the frame is under uneven tension. If the side clips won't budge, do not panic. Apply gentle downward pressure on the center of the top panel. This action relieves tension on the slide-bolts. The latches should slide out smoothly once the tension is gone. Never use a hammer or brute force to open a latch. Striking the metal weakens the welds permanently.
Evaluate your current hardware realistically. If your metal dog kennel takes more than two minutes to collapse, it fails the baseline portability test. A frustrating teardown routine discourages you from traveling with your dog. You should frame your upgrade path based strictly on your primary use-case. Standard mild steel crates work for home use, but they rust and warp over time. Advanced materials offer vastly superior folding mechanisms.
Aluminum represents the pinnacle of travel convenience. An aluminum crate utilizes robust, integrated hinges that resist warping. They are exceptionally portable. They are typically 30-40% lighter than traditional steel models. Aluminum is inherently rust-proof, meaning the hinges will never seize up from moisture. This makes them ideal for frequent travelers, RV users, and professional dog handlers. They work beautifully for owners of small-to-medium breeds like Maltese or Spaniels.
However, aluminum does have drawbacks. It requires a higher upfront cost. Furthermore, extreme chewers or highly anxious dogs may dent the softer metal over time. Aluminum sacrifices absolute rigidity for ultimate portability.
Stainless steel offers maximum security and unyielding structural rigidity. These crates are virtually indestructible. They are ideal for large, high-drive working dogs. Stainless steel resists corrosion much better than standard powder-coated mild steel. The folding mechanisms rely on heavy-duty, precisely machined drop-pin hinges. These massive hinges withstand immense torque.
The primary downside is the weight. Stainless steel is significantly heavier. Folding a massive steel crate requires effort. You need robust, well-machined hinges to ensure the folding process doesn't become a miserable two-person job.
Material Type | Portability Level | Rust Resistance | Ideal Use Case | Common Hinge Style |
|---|---|---|---|---|
Standard Wire Steel | Moderate | Low (Chips easily) | Home storage, occasional travel | Wire-wrap loops |
Aluminum | Excellent (Very Light) | High (Rust-proof) | RV travel, frequent transit | Integrated piano hinges |
Stainless Steel | Low (Very Heavy) | High (Corrosion resistant) | High-drive dogs, extreme chewers | Machined drop-pins |
If your current crate binds, rusts, or injures your hands, it is time for an upgrade. Knowing what hardware specifications to look for will save you massive headaches. You must evaluate the mechanical components before purchasing a replacement.
First, scrutinize the hinge design. You should prioritize integrated piano hinges or smooth drop-pin mechanisms. Avoid crates that rely on cheap wire-wrap loops. Wire loops bend and snag constantly. They warp under the weight of larger dogs. A machined drop-pin hinge guarantees a fluid folding motion every single time.
Next, inspect the integrated carrying handles. A folded crate is a heavy, awkward rectangle. Ensure the crate features a snap-on plastic handle or a rounded metal grip. Crucially, this handle must align precisely with the center of gravity once folded. If the handle is off-center, the heavy end will drag on the floor. This makes carrying the folded crate incredibly frustrating.
You also need to evaluate the pan retention systems. Look for slide-out pans that can be secured independently of the main frame. High-quality designs allow the pan to act as a protective exterior shell when fully collapsed. This prevents the sharp metal edges from scratching your vehicle's interior.
Finally, establish a realistic threshold for the weight versus strength ratio. A heavy-duty crate will naturally be harder to fold and carry. Buyers must weigh the need for daily teardown against the need for high-security containment. If you move the crate daily, prioritize weight reduction. If the crate stays home and only folds for seasonal storage, prioritize maximum strength.
Efficiently folding a metal kennel relies heavily on sequence and hardware condition. You must follow the exact breakdown order: ends first, top disconnected, sides collapsed. Attempting to force the panels out of order will invariably damage the frame. Removing the floor pan and interior accessories is non-negotiable for a safe teardown.
Ultimately, your portable kennel is only as useful as its hinges. If your daily teardown routine requires tools, aggressive force, or causes minor injuries, the hardware has unequivocally failed. You should not have to fight your equipment.
We advise you to test your current crate's mechanism today using the outlined steps. Clear it out and assess the joints. If the frame binds, sticks, or feels dangerously loose, it is time to upgrade. Recommend evaluating a lightweight aluminum or high-grade stainless steel alternative. Base this final decision strictly on your dog’s specific size, temperament, and your personal travel frequency.
A: No. While some highly specific premium travel models allow it, standard wire crates require the pan to be removed. You must slide it out completely to allow the side panels the necessary clearance to fold totally flat. Leaving it inside warps the base hinges.
A: This is typically caused by failing to unlatch the top stabilizing hooks first. It can also occur due to a severely bent hinge wire. Double-check all connection points. Never apply downward pressure until all top clips are visually disengaged.
A: Yes, provided it features reinforced corner welds and slam-latch doors. However, for maximum impact resistance against dogs with severe separation anxiety, heavy-duty stainless steel is the superior, albeit much heavier, choice.
A: Generally, no. Most commercial airlines strictly require rigid, non-collapsible plastic kennels that are IATA compliant for cargo transport. Folded metal crates are primarily intended for vehicle travel, RV use, and home storage.


